We're in Florida though so it's still 90 degrees outside around noon...but we have had a bit of a break in the heat in the mornings FINALLY.
I have no clue exactly what I want to be for Halloween. I know, I KNOW. I don't even know. We aren't having a party this year and without a theme or need I guess for an outrageous costume, I am just stumped. I had thought of being a skunk or Edward Scissorhands and I'm not set on either and now I've got about 2 and a half weeks to figure it all out and hope for the best haha.
If anything develops I will be sure to DIY post about it.
Keep on, keepin' on,
M.
Showing posts with label do it yourself. Show all posts
Showing posts with label do it yourself. Show all posts
Thursday, October 13, 2016
Tuesday, August 2, 2016
Is It Too Early for Halloween? Or Nah?
After all the Summertime celebrations have ended and all thoughts turn towards fall and back to school and Halloween....can I just say I am so ready. Both for the cooler temperatures and mostly decorating my house and figuring out this years costume(s). Last year I made a large head-dress with antlers

and kind of skimped out on my actual dress. This year there is a kind of plan in our neighborhood for a group costume, I don't know if we are still holding each other to this but if not, and really even if......I think I might finally make my mermaid dreams a reality and show my true form this year. It all came from a post about how shell crowns are the new flower crowns and just...OMG
 You can look at all the rest of the beauty on Chelsea Shiels' instagram: @chelseasflowercrowns.
So now I am super inspired to try my hand at making my own, and luckily Florida has many shells to choose from to help in this endeavor. Also my favorite part of Halloween is making parts of my costume, as well as make-uping my face. I am about to pin all the things and watch all the tutorials.
We are not doing any inside party this year, all will be on the outside/front of the house, I'm sure my man has something planned to make a big impact, and don't worry friends, it'll be documented properly this year!
Can't wait to get started!
Keep on, keepin' on,
M.

and kind of skimped out on my actual dress. This year there is a kind of plan in our neighborhood for a group costume, I don't know if we are still holding each other to this but if not, and really even if......I think I might finally make my mermaid dreams a reality and show my true form this year. It all came from a post about how shell crowns are the new flower crowns and just...OMG

So now I am super inspired to try my hand at making my own, and luckily Florida has many shells to choose from to help in this endeavor. Also my favorite part of Halloween is making parts of my costume, as well as make-uping my face. I am about to pin all the things and watch all the tutorials.
We are not doing any inside party this year, all will be on the outside/front of the house, I'm sure my man has something planned to make a big impact, and don't worry friends, it'll be documented properly this year!
Can't wait to get started!
Keep on, keepin' on,
M.
Friday, April 22, 2016
April Showers Bring.....Projects? Smoothies? Life Adventures?
Oh hi!
So I have at least done a once a month on here :D
But in all seriousness I've been busy, I've been up and down, I've been working all the weekends. It's been a weird time so far this 2016. I've been trying to figure out life and deal with all the things I guess grown up 30 year old ladies get to do. But I'm here! And I'm writing, so great times.
I decided on Monday that I was like "Yea, I'm gonna start getting healthy and eating well rounded meals more and less bad snacks!" So yesterday I bring my lunch to work, kale salad w/ walnuts and cherry tomatoes and a nice onion vinagrette.....and as I take a bite I chomp down on a walnut. On my not-so-great back tooth. And I cracked it :'( This is what I get?! No one ever cracked a tooth on a cheeseburger!!! So now until Monday when I go to the dentist, I can't really chew without it hurting. So now I'm making alll the smoothies. Maybe a health kick on it's own then?? But not at all how I wanted this to go.
I have made 3 smoothies so far and 2 were great and now the one I'm drinking as I type this out is, UM ok, I guess??
The first 2 as follows ( I was inspired by pinterest):
Berry Berry Great :)
Handful of dark pitted cherries
2 Handfuls of blueberries
Handful of strawberries
2 Heaping Tbsp vanilla yogurt
A Good Squeeze of honey
A Pour and a Half of cranberry juice
(Such accurate measurements)
Blend and enjoy. Also I used all frozen fruits so I didn't need ice.
Peanut Butter Yum :)
One to Two bananas (depending on the amount you want to make. I used one and it yielded about half a mason jar full)
3ish Tbsp of peanut butter
A Good Squeeze of honey
A Third of frozen apple juice concentrate
Blend and enjoy. Again no ice due to the frozen juice.
Now the third....I only changed kale from spinach but I got this recipe straight from a pinterest search
Pineapple Avocad-no :/
2 ripe avocados (it does make a full glass)
4 sliced pineapples, chopped
2 heaping handfuls of kale
A Good Squeeze of honey
A Good Pour of pineapple juice
Ice (nothing was frozen)
Blend.....for way longer than you had to on the first two and take a sip, it has an avocado texture, which is expected-but it's too thick. I was hoping as the ice melted it would be ok but I've been test sipping during this whole blog and it's not gotten better. It needs more fruit and juice and less avocado I think. If you do make it: please tell me if you improved on it.
When did this blog get so fancy and full of recipes?! I am a true at home blogger now yes! Expect all the posts on how I DIY'd my entire porch using only dollar store items, spray paint and things from Crate & Barrel that I causally had laying around my house.
But for real though, I'm having a small get together for Fourth of July weekend and I will probably DIY some decorations for that. Plus later in the year I am throwing a baby sprinkle for my dear friend and will definitely update the blog for that adventure.
Stay Tuned!! :D
Keep on, keepin' on,
M.
Tuesday, October 27, 2015
Nearly Halloween!
Hello all! It's been a bit and I'm back to update you on costumes, life and partytimes.
Saturday was our 3rd annual Halloween party, it was a good time. I made my dress up a day before, started with a simple thrifted long black dress:

Then I added a skeleton garland, some pins and some twine:
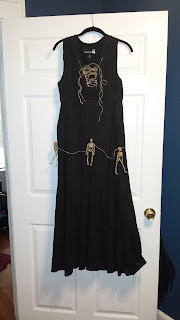


My man and I had a good time but not nearly as good as we both hoped. You are ultimately your worst critic and the idea of topping last year's soiree proved very daunting and frustraiting. Our friends loved it and at the end of the day that's what matters I guess. Next year there won't be a party (I'm 90% positive) and maybe we'll get to enjoy more haunts around town.
I am looking forward to a chilled out Halloween night on the porch with our neighbors and my bestie. Happy Haunting you guys!
Keep on, keepin' on,
M.
Saturday was our 3rd annual Halloween party, it was a good time. I made my dress up a day before, started with a simple thrifted long black dress:

Then I added a skeleton garland, some pins and some twine:

That night I added shawls for more effect and my head-dress. Make-up was equally simple with just a half sooty face and some random striping:

Here are extra shots of the night (we sadly didn't take as many as I hoped too):


I am looking forward to a chilled out Halloween night on the porch with our neighbors and my bestie. Happy Haunting you guys!
Keep on, keepin' on,
M.
Friday, October 16, 2015
DIY Antlers and Now Floral Necklace Tutorial PART 3 :)
Welcome back! This part of the tutorial is very optional. If you made the antlers and want to be done there, that's totally cool. I'm going for some drama so I added huge flowers!
STEP ELEVEN:
Cover your headband in a ribbon or fabric so the glue can better stick to it.

STEP TWELVE:
Plan out what flowers to use before attatching them. Add embellishments is so desired.


The beige flower had those same middle bits as the blue, but I had to cut them out to get the skull to properly fit.
STEP THIRTEEN:
Attach you flowers! Figure out your pattern and make it your own :)


And done! Also I realized that unfortunately the antlers and the frog piece I made earlier no longer fit together on my head. So now I at least have options during the night to switch out my "crowns". It really works out too since my antlers dried a bit wonky and stopped fitting through our doorways :/
So they are outside antlers now.
True to form I wanted more! I wanted to maybe make a floral crown to wear with my frog piece.....That did not work out. Instead it became a floral statement necklace and honestly that's fine. I was over extending on this costume and I needed to be done with it to move on to other home decorating!
STEP ONE:
Cover your base in tape, I also glued on leaves to cover the tape.

STEP TWO:
Have your baby skunk help you pick out your flowers :)
 STEP THREE:
Make your arrangement, glue it on and that's it!

I hope you enjoyed this tutorial! Come back for more Halloween themed shenanigans soon!
Keep on, keepin' on,
M.
STEP ELEVEN:
Cover your headband in a ribbon or fabric so the glue can better stick to it.

STEP TWELVE:
Plan out what flowers to use before attatching them. Add embellishments is so desired.


The beige flower had those same middle bits as the blue, but I had to cut them out to get the skull to properly fit.
STEP THIRTEEN:
Attach you flowers! Figure out your pattern and make it your own :)


And done! Also I realized that unfortunately the antlers and the frog piece I made earlier no longer fit together on my head. So now I at least have options during the night to switch out my "crowns". It really works out too since my antlers dried a bit wonky and stopped fitting through our doorways :/
So they are outside antlers now.
True to form I wanted more! I wanted to maybe make a floral crown to wear with my frog piece.....That did not work out. Instead it became a floral statement necklace and honestly that's fine. I was over extending on this costume and I needed to be done with it to move on to other home decorating!
STEP ONE:
Cover your base in tape, I also glued on leaves to cover the tape.

STEP TWO:
Have your baby skunk help you pick out your flowers :)

Make your arrangement, glue it on and that's it!

I hope you enjoyed this tutorial! Come back for more Halloween themed shenanigans soon!
Keep on, keepin' on,
M.
Friday, October 9, 2015
DIY Antlers PART 2
Hello again friends! Here is part two of perhaps a part three or four series. Doing so many parts because realistically that's how many days this is happening over :)
Ok, there's the continuation of the Antler Saga:
STEP SEVEN:
After you have let your paper maiche layers (2) dry completely you can begin the texturing and painting.


Ok, there's the continuation of the Antler Saga:
STEP SEVEN:
After you have let your paper maiche layers (2) dry completely you can begin the texturing and painting.

Ok, So what I did there is use hot glue to build a little base on my antlers. Just like real ones, they need that rough looking bit at the bottom. Then I made little bumps and continued up the antlers with lines of hot glue. It makes the antlers look rough and works for when you paint layers.
STEP EIGHT:
Paint the first layer of color. I used peach because I had it, but you can use whatever colors you'd like.

Let that dry. Paint on a second coat to cover any dark areas of newspaper.
STEP NINE:
Mix up a darker color, I used an avacado green and black. Paint that over the antlers and at the bottom, rub it off on your texture bits so it shows through. On real antlers there's this type of gradient.

Like at the base of these.
This is my interpretation:

STEP TEN:
Paint a second layer of the dark color on the antlers, making sure to cover patches of light. Don't repaint over the rubbed off texture parts though.

Then let the antlers completely dry overnight and wonder if you should paint more, source answers from friends and plan out your floral attatchments.
Stay tuned for PART 3 (and maybe FOUR :))
Keep on, keepin on,
M.
Tuesday, October 6, 2015
DIY Antlers & Floral Head-dress PART 1
My first tutorial!! Halloween is in full force over here in my little haunted house. I bought a bunch of weird gourds and all the costume supplies. Today I shall put in part one of how to make your own wearble antlers and skeleton head-piece. Part two will be a floral crown of epic proportions.
I watched and read alot of pins before starting on this project, so it's a blend of sorts. Here we gooooo.........
YOU WILL NEED:


I watched and read alot of pins before starting on this project, so it's a blend of sorts. Here we gooooo.........
YOU WILL NEED:

- 12 Gauge Wire
- Heavy Duty Aluminium Foil
- Wide Headband (2, holes optional but made it much easier to work with)
- Painters Tape or Masking Tape
- Electrical Tape
- Flowers
- Skeletons/Skulls
- Ribbon
- Paint, Colors Your Choice
- Newspaper (not pictured, and almost forgotten)
You will need some of these items more in part two, but here are the steps for how I began making my antlers!
STEP ONE:
Make a shape for the base of your antlers, freehand or with refrences,

STEP TWO:
Wrap the wire base in the foil. Some tutorials only used foil as the base, which is really crafter's choice. I wanted the wire for strength but also because I would be attaching the antlers to a headband.

STEP THREE:
Oooh got a little ahead with that last picture! Ok, so once you wrap the first base antler with foil, cut smaller pieces of your wire and attach them to your base. I then used the electrical tape to smooth it out for the future foil. Antlers, like eyebrows are sisters and not twins, so don't worry if they aren't super symetrical. Also leave about 2 inches of wire bare at the bottom for attaching purposes. Oh and, when you wrap the foil, make the bottom a bit wider to mimic real creature horns.

(Unlike me who did end up fussing with these too long before I recognized their unique ways.)
STEP FOUR:
Wrap the entire thing in masking or painters tape. It provides a more textured surface for the paper maiche and it smoothes out the foil bumps.

STEP FIVE:
Attach the antlers to your headband

The headband/wire combo really holds up. And at Halloween party time, that is clutch.
STEP SIX:
Prepare your paper maiche. One part Mod Podge and one part water. Use plastic dishware.
Cut newspaper strips.
Cover your work station :)

(I never did use the foam brush except to mix)
It's the same paper maiche technique you learned in school, dip your paper, squeeze off excess, adhere to surface. Continue until you have one full layer and let dry. You can wait a couple hours or do overnight like me only because I wait to be lazy the rest of this night haha.
While your antlers dry, begin on your floral head pieces. I am making two of them along with my antlers because obviously I love to make myself crazy/my Halloween character this year is Dramatic! :)
So here's my little frog skeleton head piece:
STEP ONE:
Find a headband that is big enough to fit on the front of your forehead. Once you have it, take your skeleton and wire this creature to the front middle.

I used electrical tape to cover the comb bits on the headband for pure comfort.
STEP TWO:
Put some flowers on it!

Lana Del Rey that skeleton. Make an outrageous crown for yourself. It's the best holiday for it!
STEP THREE:
Your antlers are pretty dry by now, so go ahead and put them on with your frog piece. See how they look together and decide "Is this enough or too much?" Spoiler, you can never be too much.

Tomorrow I shall be continuing on the antlers, so look for PART 2 soon :)
Keep on, keepin' on!
M.
Subscribe to:
Posts (Atom)